
Berwyn Epoxy Flooring installs metallic epoxy floor systems in Berwyn, IL, serving surrounding cities including Forest Park, Lyons, Brookfield, River Forest and Summit. After 20+ years of resin floors we treat metallic work as its own trade inside the trade: the look depends on a flat, sound slab and on a crew that can work a fast-moving pour by hand.
A metallic floor shows every flaw underneath it more than a flake floor ever would. That is why each job starts with diamond grinding, crack repair and a moisture test, and why we tell you before quoting if a slab is too damaged, too uneven or too damp to give you the finish you have in mind.
The proposal names each product in the system, the primer, the metallic coat and the topcoat, with the finished thickness. You see sample boards in your colors before anything is poured, so the floor you approve and the floor we install are the same floor.
How a Metallic Epoxy Floor Gets Its Look
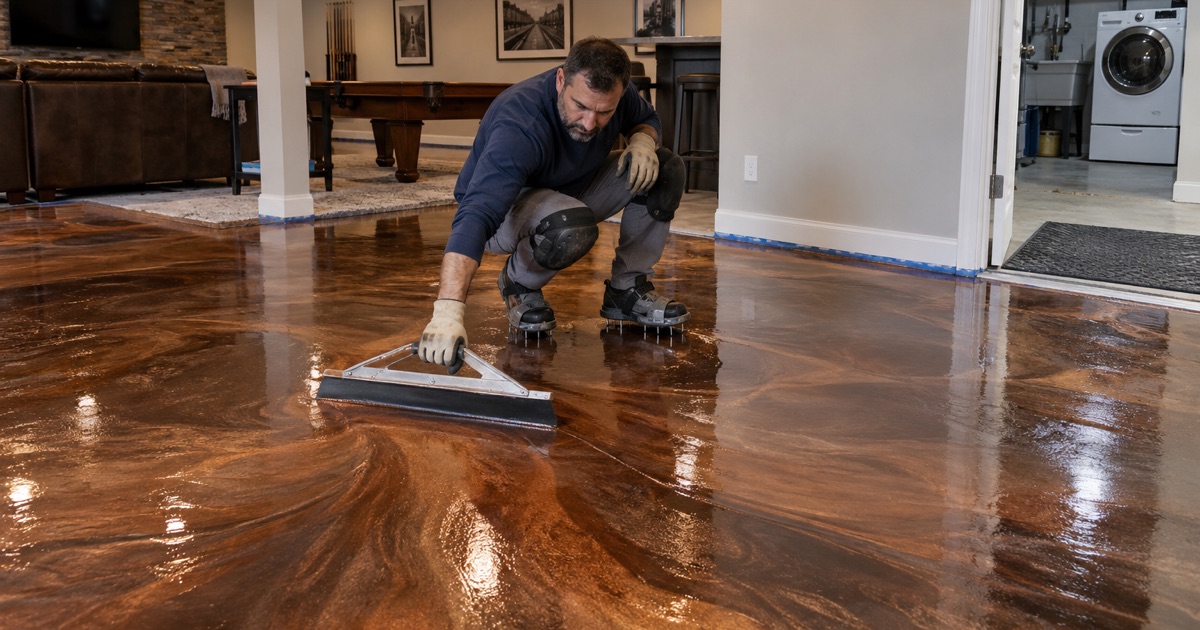
Mica Pigments in Clear Epoxy
Metallic floors use fine mica-based pigments mixed into a clear 100% solids epoxy. As the coating levels, the pigment particles turn and settle at different angles, catching light so the surface looks deep and three-dimensional.
The effect changes with the light and the viewing angle. A floor that reads as soft silver in the morning can look like dark pewter under evening lamps, which is why we sample in your room.
Working the Pattern by Hand
The pattern is created while the epoxy is wet and still moving. Installers use rollers, trowels, brushes, sprayed solvent and sometimes a leaf blower to push and pull the pigment into clouds, veins or swirls.
The working window is short, and every part of the floor has to be worked before the edges set. On a large floor we use more installers rather than rushing, because a hurried pour leaves visible seams between sections.
Base Tone and Color Choices
A tinted base coat underneath the metallic layer sets the overall tone. Dark bases give dramatic contrast, while light bases produce soft, pearly floors.
Most clients choose two or three metallic colors that complement one another. We have learned that fewer colors used well usually look richer than many colors fighting for attention.
Preparing a Slab for Metallic Epoxy
Grinding Flat, Not Just Clean
For a flake floor, grinding mainly opens the surface. For a metallic floor, it also has to flatten it, because metallic pigment pools in low spots and thins over high spots and makes every dip visible.
We grind with diamond tooling to remove high spots, old coatings and the weak top layer of the slab. We never acid etch, since it cleans unevenly and does nothing to improve flatness.
Cracks, Joints and Patching
Cracks are routed and filled with a rigid repair material, then ground flush with the slab. Control joints can be filled and coated over for a seamless look or left open and honored in the design if the slab is still moving.
In older basements we often find trenches where plumbing was replaced. Those patches are leveled carefully, because a patch that sits even slightly proud of the slab will show through the finished metallic floor.
Moisture Testing and Primer
A metallic floor is often installed in a finished basement, which means a slab in contact with damp soil and often with no vapor retarder below it. We test moisture with ASTM F2170 relative humidity probes or an ASTM F1869 calcium chloride kit before choosing the primer.
If the readings call for it, a moisture-mitigation primer goes down first. A blister in a flake floor is a repair; a blister in a metallic floor interrupts the pattern and is much harder to hide.
Where Metallic Floors Work Best
Finished Basements and Family Rooms
In a basement family room, bar area or home theater, a metallic floor turns concrete into a finished surface that does not mind a damp day or a spilled drink. It pairs well with area rugs and needs only a dust mop and occasional damp cleaning.
On older homes, we check for paint and old adhesive first, because a prewar basement floor may carry decades of layers that all have to come off before a metallic pour.
Showrooms, Salons and Storefronts
Metallic epoxy is popular in salons, boutiques, galleries and showrooms where the floor is part of the brand. It reflects lighting, makes a room feel larger and holds up to foot traffic and rolling chairs. For storefronts we schedule around business hours, often overnight or across a weekend, and plan cure time so the space can reopen on a known day.
Bars, Restaurants and Front-of-House Areas
Front-of-house areas in restaurants and bars use metallic floors to make a statement that is still easy to clean. We add an anti-slip additive where spills are frequent and choose a topcoat that resists cleaning chemicals.
Kitchens and areas with hot washdown are different and usually need urethane cement. A metallic floor can stop at the kitchen door with a clean transition between systems.
Protecting the Finish
UV-Stable Topcoats Against Ambering
Epoxy ambers, turning yellow over time when exposed to sunlight. On a metallic floor that shift changes the colors you chose, so we finish with a UV-stable polyaspartic or aliphatic urethane topcoat.
The topcoat also adds scratch resistance and lets you choose the sheen. High gloss shows the most depth, while satin hides more wear.
Cleaning and Care
Daily care is a dust mop or a microfiber pad, with a neutral cleaner for weekly washing. Grit is the main enemy of a glossy floor, so entry mats and felt pads under furniture go a long way.
Avoid harsh cleaners and anything with acids or citrus solvents, which can dull the topcoat over time. We leave written care instructions with every floor.
What Moves the Price
Metallic floors cost more than flake or solid coatings because of the materials, the extra flattening work and the hands needed during the pour. Extensive crack and trench repair or a moisture-mitigation primer adds to that.
A simpler two-color design in an open room costs less than a multi-color pattern in a basement broken up by walls and posts. The proposal breaks each of those parts out separately.
Our Step-by-Step Metallic Epoxy Floor Process
Step 1: Samples and Slab Testing
We prepare sample boards in your colors, inspect the slab, test moisture and write a proposal naming the system and thickness. You review the boards in the room itself, under the lights you will actually live with, and approve the colors and movement before any material is ordered.
Step 2: Grind and Repair
The slab is ground flat and clean, cracks and patches are filled and leveled, and dust is collected throughout. We check flatness with a straightedge as we go, because a low spot that would vanish under flake becomes a dark pool under metallic pigment.
Step 3: Primer and Base Coat
The primer goes down, followed by a tinted base coat that sets the floor’s overall tone. Both are applied within the slab temperature and dew point window, and any moisture-mitigation primer the testing called for goes on before them.
Step 4: Metallic Pour and Topcoat
The metallic layer is poured and worked into its pattern, then sealed under a UV-stable topcoat once it has cured. You get written times for foot traffic and for moving furniture back, along with a care sheet for the first month while the topcoat reaches full hardness.
- 20+ Years Coating Floors
- Moisture Tested Before Quoting
- Free Written Estimates